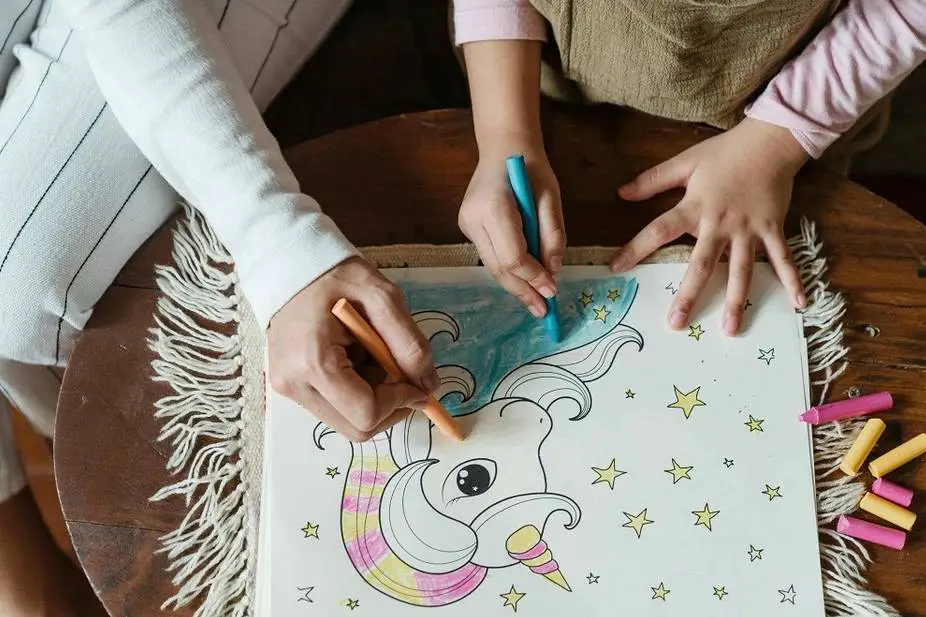
Imagine a quiet afternoon with your child immersed in a creative project that sharpens their focus without a screen in sight. Paint-by-number activities have long been a staple in homes and classrooms, providing a gentle introduction to artistic expression and skill building. For young learners, these structured yet imaginative tasks develop fine motor skills through precise coloring, encourage counting by matching numbers to colors, and promote attention to detail by staying within lines. They also foster a sense of independence as kids follow instructions at their own pace, building confidence with each completed section. Whether at home during family time or in a busy classroom, Paint by Numbers seamlessly adapts to different ages and environments, turning everyday moments into opportunities for growth. If you’d like to personalize the fun, learn how to convert photos to Paint by Numbers and turn a treasured snapshot into a custom masterpiece.
What is Paint-by-number and why is it beneficial for children?
At its core, paint-by-numbers is a simple art technique in which a pre-drawn outline of an image is divided into numbered sections, each corresponding to a specific color from a provided palette. Originating as a hobby kit after World War II, it has evolved into an accessible tool for education and play. For children, the appeal lies in its simple structure: no prior drawing skills are required, just a willingness to explore colors and shapes.
The educational benefits are plentiful. Numeracy gets a playful workout as kids count and sequence numbers, reinforcing basic math concepts like one-to-one correspondence. Color recognition and matching encourages visual discrimination, helping kids distinguish shades and tones – essential for early literacy and science explorations. Following the numbered guide also introduces reading simple instructions and builds patience and perseverance as they complete the puzzle-like picture step by step. Research from child development experts, such as the American Academy of Pediatrics, highlights how such activities support executive function skills like planning and self-regulation without the pressure of open-ended art.
For parents, it’s a win-win: a low-stress, screen-free activity that keeps curious minds occupied for 20-30 minutes, ideal for after-school or rainy-day relaxation. Teachers appreciate it as a ready-made center for “art and math” rotations, where small groups rotate through stations, minimizing prep time and maximizing engagement. In diverse classrooms, it levels the playing field by allowing all students to contribute to a common creative output. And when you convert a family photo into this format, it adds an emotional layer-kids beam with pride as they see their loved one’s face appear in vibrant colors. This personalization makes the process even more rewarding, combining creativity with connection.
Preparation and Materials
Getting started with paint-by-numbers doesn’t require a fancy art studio—just thoughtful planning to ensure safety and success. Begin by selecting a suitable photo: opt for one with a prominent subject, like a pet or family member, against a simple background. High contrast between elements helps define clear sections, avoiding a cluttered result that frustrates young artists.
At home, gather non-toxic supplies: colored pencils or washable markers for easy cleanup, or tempera paints and acrylics for bolder results (always child-safe and water-based). Use drawing paper weighing 120-160 gsm to prevent bleeding, masking tape to secure pages, and a basic printer for outputs. A ruler and eraser come in handy for tweaks.
In the classroom, scale up for groups: print templates at varying complexity levels, prepare shared palettes in muffin tins, and set out water cups, sponges for blotting, and paper towels. Drying racks or file folders keep works flat and organized. For inclusivity, have extras like large-grip brushes. Budget tip: repurpose egg cartons for paint mixing. With these basics, you’re set to convert photo to paint by numbers effortlessly, turning prep into a seamless part of the fun.
Method 1: The Fast Digital Approach-From Photo to Outline in 10-15 Minutes
For tech-savvy parents or teachers with access to a computer, the digital method streamlines the process of converting a photo into a paint-by-numbers drawing and quickly produces professional-looking results. Start with image prep: Open your chosen photo in a free image-editing program like GIMP or Preview (on the Mac). Crop to an A4-friendly aspect ratio – about 8×10 inches – to fit standard printing. Boost contrast by adjusting brightness and shadows to sharpen the edges between colors. Simplify the background by blurring or selecting only the main subject to reduce visual noise for younger eyes.
Next, extract contours: use the Edge Detection tool to trace outlines and create bold black lines around blocks of color. Apply posterization – a filter that reduces the image to flat zones of color – for beginners, aim for 6-12 distinct areas. This flattens gradients into solid shapes, making numbering intuitive. Save iterations: one with numbers overlaid, another as simple line art for advanced colorists who want to invent their palette.
Now, numbering and palette creation: scan the posterized image and assign sequential numbers to each zone, starting with the largest for momentum. Limit to 6-12 colors for ages 4-6 (think primary reds, blues, yellows), scaling up to 12-18 for older kids with secondary hues. Label practically: “Sky Blue #1” or “Leaf Green #3” next to numbers, using descriptive words to tie in with vocabulary lessons. Create a legend box that lists colors with samples – print it separately for easy reference.
Export as a high-resolution PDF with 8-12 mm margins for binding, then print on heavy paper. Test a sample: hold it up to the light to check line thickness (aim for 1-2mm). Pro tip: Create two versions-one numbered for reference, one contour-only for creativity. This method shines in the classroom, where you can batch process class photos for a unified project. Kids love the “magic” of seeing their snapshot digitized into art, and it builds digital literacy along with traditional skills.
Method 2: The Hands-On Analog Way-sketching and simplifying without a computer
Not everyone has a printer or software on hand, so the analog method offers a charming, low-tech alternative to turning photos into paint by numbers. It’s perfect for impromptu sessions and teaches observation skills through manual tracing.
Print or paste your photo onto sturdy cardboard for stability. Overlay a sheet of tracing paper or clear acetate film and tape the edges in place. Draw a basic grid: 2×2 for simple images (ages 4-6) or 3×3 for more detail, dividing the photo into manageable cells like a window pane.
In each cell, identify dominant “patches”-broad areas of light, shadow, or color. Use a fine-tip marker to lightly outline these shapes at first, connecting across grids for smooth contours. Erase grid lines as shapes emerge, focusing on 6-10 large zones to keep it kid-friendly. For complexity, add subtle sub-shapes within, but avoid over-detailing.
Number the areas sequentially with a bold marker, grouping similar colors logically (e.g., all greens together). Create a palette on scrap paper: dab paint or crayon swatches next to the numbers, naming them simply-“Sun Yellow #1,” “Grass #4. Test matches by holding the tracing over the original photo.
Transfer to final paper: On a sunny day, tape the outline to a window for backlighting, or use carbon paper underneath for direct copying. Alternatively, a desk lamp works wonders for tracing indoors. This tactile process builds spatial awareness as kids watch shapes “jump” from photo to page. In a group setting, pair up buddies for grid drawing and turn it into a collaborative warm-up. The result? A customized template that’s as unique as the memory it captures, proving that creativity thrives without screens.
Adapts to age and skill level
Tailoring paint-by-numbers ensures success for every child, turning potential frustration into triumph. For 4-6 year olds, simplify ruthlessly: stick to 4-6 expansive zones with ultra-thick contours (3mm+), using chunky brushes or markers to forgive shaky hands. Skip paints for crayons if mess is an issue-their built-in grip fits tiny fingers.
Ages 7-9 thrive on moderate challenge: Sections 8-12 introduce blending, such as mixing #1 Blue + #2 White for sky gradients. Add a mini-legend with color recipes (“stir two tablespoons of #3 for purple”) to encourage experimentation. Encourage verbal check-ins: “What number goes with the tree?”
For 10-12 year olds, build up to 12-18 zones, incorporating tones – light #5 for highlights, dark for shadows. Introduce hatching with colored pencils for texture, linking to art history chats about Impressionism. They might even create their own numbering system.
Differentiation is key: From one photo, create three templates-basic, intermediate, advanced-by varying the number of zones and line weight during the Paint by Numbers step. Distribute by ability: Observe quietly during attempts to match levels, or let kids choose for themselves with a “challenge ladder” poster. This inclusive approach honors different speeds and builds self-esteem across the board.
Extend the activity: Cross-Curricular Connections
Paint-by-number isn’t just art-it’s a springboard for integrated learning. In language arts, have kids write a short caption or story for their picture: “The brave dog #2 chased ball #7 around field #4.” Label zones with descriptive words, organically building vocabulary.
Link to math: tally color frequencies for pie charts (“What fraction is #1?”), or calculate area by gridding slices-perfect for geometry basics. Older students can graph “color coverage” percentages and discuss rounding rules.
For science and art, discuss color theory: warm reds (#6) evoke energy, cool blues (#1) calm. Journal prompts like “How does #3 green make you feel in nature?” blend observation with expression. These extensions turn a 30-minute coloring session into a full lesson that shows kids how subjects are connected. When you turn Photo into Paint by Numbers with themed images (e.g., animals for biology), the relevance skyrockets.
Accessibility, Inclusion and Ethics
Prioritize equity at every step. For the visually impaired, increase contrast and boldness of lines; pair numbers with word labels (“one” next to 1) or tactile symbols (raised dots with glue). Audio descriptions during group work-“Zone 5 is the big blue sky”-help with navigation.
Address color blindness with marker-based palettes, labeling vividly (“bright red, not pink”) and avoiding red-green pitfalls – swap out blue-orange schemes. Test templates with diverse groups for feedback.
Ethically, consent is non-negotiable: use family photos only with permission, anonymize for class sharing. Choose public domain images (e.g., nature shots) for broader use, modeling respect for privacy in the digital age.
Organize at home and in the classroom
Streamline sessions for a smooth flow. Allow 25 minutes for painting plus 5 minutes for cleanup, using a gentle timer like a sand hourglass. At home, designate a “creation station” with all supplies in bins; in class, rotate three spots: materials prep, coloring tables, and drying racks.
Empower kids with a kid-friendly checklist: “Choose color → Find matching number → Color within lines → Check legend.” This builds routines independently.
Celebrate results: file finished pieces in portfolios to track progress, or host a “gallery walk” where peers applaud efforts. These habits make the transformation from photo to paint by numbers a joyful ritual, not a chore.
Common challenges and quick fixes
Even the smoothest plans hit a snag-here’s how to pivot. Tiny zones overwhelming? Merge adjacent ones as you outline, thicken lines with a digital brush, or redraw with a marker. The result: fewer numbers, more flow.
Muddy colors from over-diluting? Dilute less, apply thin layers, and dry between coats; label jars clearly to avoid mix-ups. If you get lost, mark the current color on the legend with a sticky note and work sections in blocks of color (all #1s first).
Wearing down? Break into 10-minute bursts with stretch breaks. These tweaks will keep spirits high and ensure that every session ends with a smile.
Wrap it up: Celebrating Creativity
As the brushes come down and the paint dries, gather for reflections: “What was your favorite zone? What felt difficult?” Praise effort over perfection, noting growth in focus or color choice. This method grows with your child-from simple shapes to nuanced palettes-proving that accessible art is lifelong.
Print your templates today and share your adaptations in the FreeKidsBooks community-we’d love to see the smiles they bring!


Try it, and yes, the digital method streamlines the process of converting a photo into a paint-by-numbers drawing and quickly produces professional-looking results.